How To Lauter Your Mash – For Better Tasting Liquor
Why Would You Want To Lauter?
“Lautering”, or filtering, mash before fermentation is the norm for making grain-based beer. Among brewers, it’s generally appreciated that the grain hulls can impart tannins and phenolic compounds to the beer, lending a bitter, astringent taste to the brew. For distillers however, lautering is not a common practice. While most home distillers filter their fermented mash before distillation, others simply distill the entire mash, spent grain and all, often using a double-boiler or a steam distillation process to avoid the possibility of the thick mash burning on the bottom. However, there are a couple of good reasons why filtering to remove the spent grain before fermentation, the way brewers do it, may be advisable for distillers as well.
Advantages to lautering mash ?
The primary reason is the taste of the distillate. While distillation removes most of the phenoloic compounds that leach out of the grain hulls, some of this material will inevitably find its way over into the distillate, particularly if a late tails cut is made in an effort to get more of that traditional ‘corn whiskey’ taste admired by bourbon lovers. My own experience is that too much contact with the spent grain will give the liquor a chemical or even garlic-like off-taste. One of the most mellow whiskeys I’ve ever tried is one made by a 400-year-old Belgian beer brewery that uses their beer recipe to make a single-malt whiskey: They make exactly the same brew (sans hops, of course), but distill it. As with their beer, the mash is clarified by filtering, then boiled, cooled, and fermented, but instead of being bottled, the fermented product is distilled and aged in oak barrels. Despite a relatively short aging time, the resulting whiskey is impressively soft.
The second argument for lautering mash is that you work with a clear, sediment-free liquid that can be fermented in a modern conical fermenter without clogging the outlets with grain hulls or sediment, and the yeast can be collected for re-use if desired. There are several kinds of
conical fermenter’s on the market these days, here are some examples:
- Made of stainless steel – https://www.ssbrewtech.com/products
- Made of PET – (https://vimeo.com/236411620
- Made of High-density polyethylene –http://www.fastbrewing.com/products/fastferment
Some models are even available with such niceties as temperature control or built-in gravity-monitoring devices. I have two relatively simple 30-liter wall-mounted conicals in the basement that I acquired in my beer-brewing days, and these have been a joy to work with. Moreover, with the spent grain removed, the clear wort can be briefly brought to a boil, killing any microorganisms, without the danger of the hot wort dissolving additional phenolics out of the grain hulls.
What are the dissadvantages to lautering mash ?
There are some downsides to lautering, and filtering mash after fermentation is admittedly much easier. A fermented wash is thinner and is filtered cold (as opposed to filtering at a skin-blistering 70 to 75° C for wort) and we’re not dealing with a thick, sticky sugar solution. Moreover, a “stuck” runoff, where the grain bed compacts and will not pass liquid, can be an exercise in frustration. Indeed, lautering involves two or three hours’ extra work and certain amount of skill, but the improvement in the taste of the final distillate is quite noticeable.
How Does Lautering Work?
“Lautering” and “sparging” are used almost interchangeably, though strictly speaking, lautering means using the grain itself as a filter (probably from the German lauter, meaning “pure” or “clear”), while sparging refers to the rinsing of the mashed grain using additional hot water to collect the last of the sugars.
Batch Sparging vs Fly Sparging
There are two approaches to lautering, commonly called batch sparging and fly sparging. As the name suggests, batch sparging is done in two or three “batches”: The wort is drained off the grain, then the grain is re-suspended in hot water, and drained again, and sometimes resuspended and drained yet again for a third rinse. The liquid from all the collected rinses, if intended for for distillation, is combined in the fermenter. Batch sparging was widely used in pre-industrial beer brewing. Rather than combining the rinses, the beer-brewer would make “strong”, “small”, and “table” beers from the increasingly weak runoffs. The latter was usually less than 1-2% alcohol, and was intended for consumption at the dinner table by women and children.
Want To Learn More About Batch Sparging ?
Here’s a video that demonstrates the process of batch sparging, it’s long but very informative. Thanks to Mr. Beer for making this video.
Fly Sparging – A How To Guide!
Presently more popular, and more applicable to making wort for distilled spirits, fly sparging is a continuous process done “on the fly”. Here, the wort is continuously drawn off the mash from the bottom while hot water is added to the top to keep the liquid level more or less constant. Using a hydrometer, or better, a refractometer, the sugar content in the output is continually monitored and the process stopped when the sugar percent drops below a certain level. A specific gravity of less than 1.010 or 3 degrees Plato would be a reasonable cutoff point.
This article will discuss only fly sparging, since the author has no experience with batch sparging, and indeed sees little practical application for this rather archaic method to the making of distilled spirits.
Equipment Required:
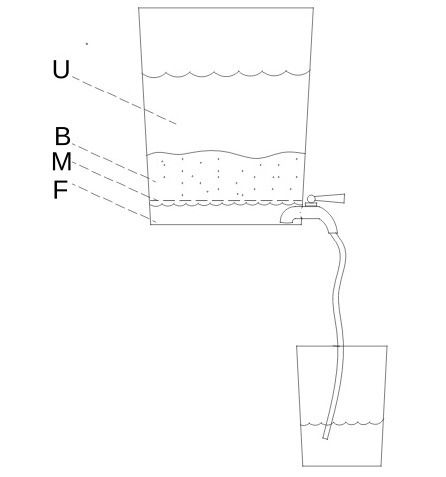
A “lautering tun” consists of a large bucket big enough to hold all your mash with a bit of room to spare. It has a perforated-plate or metal-mesh false bottom, and an outlet with a valve to regulate the flow (Fig. 1). The author has made two such devices. The first (Fig. 2) consisted of a 15-liter bucket with a large, stainless steel wire-mesh strainer (with the handle cut off) that just fit the bottom. The valve was one of those plastic valves that are sold for use with bucket fermenters that are readily available from home brew shops. Because the valve stuck out from the bottom of the bucket, a small wooden stand was necessary.
At a certain point, a larger device became desirable. This second lauter tun (Fig. 3), the one currently in use, is based on the sort of 30-liter plastic brewing bucket commonly sold in homebrew shops. These typically come with a valved outlet near the bottom, and made-to-fit false bottoms consisting of perforated stainless steel plates are widely available. Some models have plates held off the bottom by short legs while others, such as the one shown here, are simply bent into a tent-like form.

It’s important to point out that the wire mesh or perforated plate is not what does the actual filtering. Rather, it’s the spent grain hulls in the mash that act as the filter. This material will settle onto the false bottom where it forms a natural filter, and is capable of straining out even the most minute particles of flocculent, giving a pure, clear wash. The grain bed, however, can be quite dense, and liquid does not flow through it readily. To hasten the flow, some degree of vacuum is necessary, and for this purpose, the lauter tun is placed on a table or countertop with a meter or more of flexible plastic tubing attached to the outlet valve. When this tube is completely filled with liquid and hangs down it’s full length, it forms a siphon that will create enough vacuum to pull at least a liter of liquid through the grain bed every four or five minutes.

The Process:
Before adding the mash to the lauter tun, it’s a good idea to fill the bucket to just above the the level of the false bottom with hot water. This will help prevent the grain hulls from packing onto this surface, and will make for a looser, faster-running grain bed. Plenty of hot water should be available before beginning. A temperature-controlled electric brew kettle is ideal for keeping a supply of hot water (at least 1.5-2 times the volume of the mash itself) on hand for the sparging procedure. A water temperature of around 76° is recommended. At lower temperatures the sugar solution will be too viscous, and higher temperatures will tend to leach undesirable compounds out of the grain hulls.
The mash – still hot from the mashing process – is ladled into the bucket evenly, and when all has been added, the spent grain should begin to settle out a bit, leaving a layer of liquid on top. The next step is to fill the drain hose completely with liquid. The hose is lifted up above the liquid level in the bucket, the valve at the bottom is cracked open slightly, and, with the drain tube held vertically, it is allowed to fill until there is no air in the hose. The thumb is held over the end to prevent air entering (which will break the vacuum), the tip is lowered and placed under a bit of water that has been added the collection vessel. This creates the siphon effect that will suck the liquid down through the grain bed. While filtering could also be done using gravity alone, this would take several hours. In fact, depending on the height of the lauter tun relative to the collection vessel, the siphon can even work too quickly. Use the valve to regulate the flow so that no more than a liter or two is collected every five minutes. With a higher flow rate, there’s a risk of compacting the grainbed too tightly, stopping the flow altogether.
The wash that initially comes through will still be cloudy. Allow the liquid to continue draining until the level in the lauter tun is just above the grainbed. Dump the cloudy liquid collected back into the top of the lautering bucket – carefully, so as not to disturb the grainbed – and run it through again. After doing this two or three times, the wash coming out will be completely clear. At this point, you begin replacing the liquid above the grain bed, each time the level gets low, with your hot water, in a continuous process. There are even float-valve-operated spray gadgets available to do this automatically. This continues until the sugar content in the runoff drops below the level where it’s no longer worthwhile to collect it. This can be determined by measuring with a hydrometer or refractometer as described above, by tasting for sweetness, noting when the runoff stops feeling sticky, or simply running at least as much sparge water through as the original volume of the mash. The entire process usually takes about 2 hours, depending on the volume of mash and the surface area of the false bottom.
Here’s A Video Using Fly Sparging
Things That Can Go Wrong and How to Fix Them
Stuck Runoff – Liquid won’t flow through grain bed
The ‘stuck runoff’ is the nemesis of fly sparging. When this happens, the grain bed gets too compacted and no more liquid will flow. The easiest way to fix this is to ‘ventilate’ the grainbed by poking holes in it with a thick wire or an icepick. One can also try the ‘blowback’ method, either lifting the drain tube high enough that it forces a bit of liquid back up through the grainbed, or even funneling a bit of hot water back into the tube (but don’t let any air enter the lauter tun!). Either way, the runoff will again turn turbid for a while and recycling the cloudy part back through the grainbed as described above will be necessary to clarify it.
Some grains are particularly prone to producing slow runoffs. Wheat, whether flaked or malted, if it represents a significant portion of the grain bill will lead to a gelatinous mash that can stop or greatly slow the runoff. Flaked corn – corn whiskey lovers beware – is another adjunct that tends to produce a thick goo and long runoff times, though flaked barley, in my own experience, has not been a problem. The work-arounds are limited, but adding rice hulls to the milled grain reportedly loosens the grainbed allowing a faster runoff, as does simply milling the malts and grains more coarsely. Beyond that, there is only patience, as the runoff trickles through and the hours pass by.
Air Gets Into System, Losing Vacuum
The other thing that interferes with a smooth runoff, and something more often encountered by the author, is air getting into the system and diminishing or destroying the vacuum. This is especially difficult to correct if air gets sucked all the way back into the bucket and gets up under the false bottom. The plastic valves that come with brew buckets are particularly bad about leakage, and a metal ball valve here is a good investment. Otherwise, the plastic valves should be well-greased with a silicone grease and replaced at the first sign they’re letting air in. Note that the valve in Fig. 1 has a small length of downward-curved tubing on the inside of the bucket, so that the liquid is pulled from the bottom of the lautering vessel. This way, if a small amount of air does get into the lower chamber, it will not be sucked back into the drain tube where it could break the vacuum.
At any rate, the siphon tube will probably need to be ‘burped’ from time to time, since dissolved air from the runoff liquid itself will tend to collect at the top of the tube. To do this, shut the valve off completely, hold the tube up high, and let the air bubble up to the top of the tube. Then, with the tube still held vertically, crack the valve open, lower the tip gradually and allow it to refill. Again using a finger as a stopper, the tip of the valve is placed under the surface of the collected liquid and sparging is resumed. This burping action will most likely need to be repeated several times during the course of the lautering process. The amount of suction is directly proportional to the length of the water column in the siphon tube. If the upper quarter becomes filled with air, the suction is 25% less, and the runoff takes 25% longer.
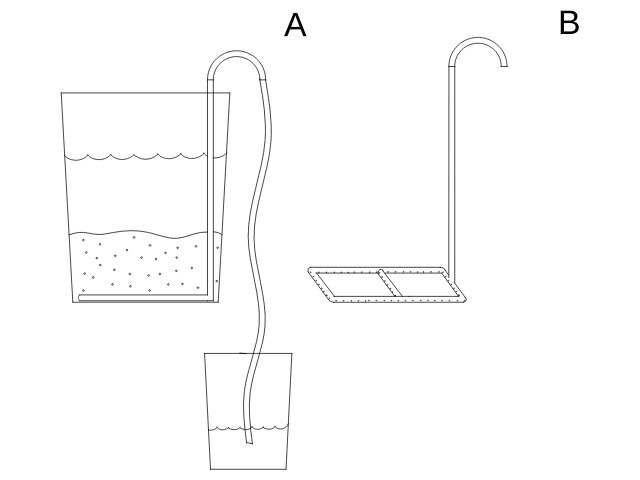
Air that has gotten all the way into the bucket, under the false bottom, can be very difficult indeed to get rid of. The only sure solution is to dip out all the mash, resuspend it, and start over . Sometimes, a blunt knife or stiff wire can be run down the inside of the bucket, pushing the flexible plastic away from the edge of the perforated plate, allowing the air to escape and bubble to the top but results, as they say, are ‘unpredictable’. Note that trapped air presents more of a problem for designs that have their drains higher, on the side, than those with them on the bottom. A home-brewer friend of the author has largely eliminated this issue by getting rid of the false bottom altogether. His design consists of a grid of PVC tubing on the bottom of the lauter bucket with holes drilled into it on the underside. Instead of draining near the bottom, this grid connects to a length of PVC pipe coming up to the top of the bucket (Fig. 4). The siphon action pulls runoff through the grainbed, out from the bottom of the bucket, and up the pipe, which is connected, as usual, to a length of tubing acting as the siphon. The disadvantage: if air does succeed in getting into the tubing or the vacuum is broken, it may not be possible to purge the tube as can be done for drains at the bottom of the bucket.
It’s common among home brewers to combine a version of the PVC-pipe design with a picnic cooler, using the drain outlet as the pipe exit. The mashing takes place in the insulated cooler (where the mash temperature will change by less than a degree or two an hour) and when mashing is done, a valve is opened, and lautering proceeds using the cooler itself as the lauter tun, without having to transfer the mash to a separate container. The author has no experience with this design, however.
In Summary
Though the equipment required is relatively simple, lautering is time-consuming and can prove frustrating. However, eliminating grain and grain particles from the wash will produce a much milder-tasting distillate, will enable the distiller to use modern, efficient fermenting equipment, and will permit boiling the wash before fermentation, thus eliminating microörganisms that might produce off flavors or turn the mash sour, so that a longer, more complete fermentation is possible. As with much of brewing and distilling, lautering is an art that’s perfected through experience, and one of the many little techniques one learns along the way in going from a good product to an excellent product.
If you enjoyed this article or have a question feel free to drop me a comment below. If you’re interested in learning more here’s a few other articles I’ve written in the past.
- Constructing A Spirit Still and Gin Basket – The Gin basket is a must for any home distiller.
- Introduction to Grain Mashing for the Home Distiller – If you’ve never made a grain mash this article has all the information you need to get started.
- The Thumper Keg Explained – What it does and how it does it!