Build This Cheap And Easy Still At Home – 20L Still With Thumper and Worm Condenser !
In this article I am going to explain how to build your own still and thumper keg for a low cost that is easy to use and good for learning the basics of home distillation.
![]()
Materials Needed
First things first, here is a list of things that you will need:
- Large cooking pot. 15-20 litre.
- 2 litre nano keg.
- 15mm Brass tank connector.
- 15mm brass pipe connector x2.
- 25mm-15mm reducer.
- 15x20x20 reducer tee.
- 15mm copper pipe. Approx. 70 cm.
- 90-degree 15mm elbow joints x2.
- Lead free solder and flux.
- PTFE plumbers tape.
- Butterfly clips.
Step 1. Make the Thumper

Take the Nano keg and cut away any plastic parts that are attached. Then measure the height of the keg. The keg I used is 25cm tall. Measure the height of the 15x20x20mm reducer tee then cut a piece of 15mm copper pipe that is long enough to pass through it into the Nano keg but stops 2-3cm from the bottom, while leaving 2-3cm on top in order to attach a 15mm brass pipe connector. The reducer tee may require some filing on the inside to allow the pipe to pass through it. The hole on top of my keg is 20mm. The reducer tee required for the top is therefore a 15x20x20mm so that it can be soldered into place with a good seal around the edge. Solder a 20-15mm reducer in to the exiting arm of the reducer tee. Add a 2-3cm piece of copper pipe to the reducer to allow you to add a 15mm brass pipe connector so you can attach a condenser.
Step 2. Make the lid of the Still
Take the lid of the cooking pot and drill a hole as close to the centre of the lid as possible. The hole must be big enough to allow you to fit a 15mm brass tank connector. If you want you can also add a thermometer to the lid. This is not strictly necessary but is useful, after some experience, to aid in telling where the Heads, Tails are Hearts start and end.
Step 3. Making the Column
To make the column you will require a length of 15mm copper pipe, two 90-degree 15mm copper elbow joints, flux and lead-free solder (lead-free must be used for obvious reasons, as high proof spirit is a solvent which can cause dangerous chemicals to leach into your shine).
The column will need to be taller than the thumper keg as it will have to connect to the top via the brass pipe connector. The bottom of the column will fit to the tank connector on the pot lid. Measure the radius of the thumper keg and add 1-2cm to get the measurement for the top arm of the column. For the column itself measure the total height of the thumper and add 2-3cm. Attach the top arm to the column with a 90-degree elbow joint on either end. Set up the thumper and column and work out what size you need the down pipe to be, in order to connect it to the brass pipe connector on top of the thumper.
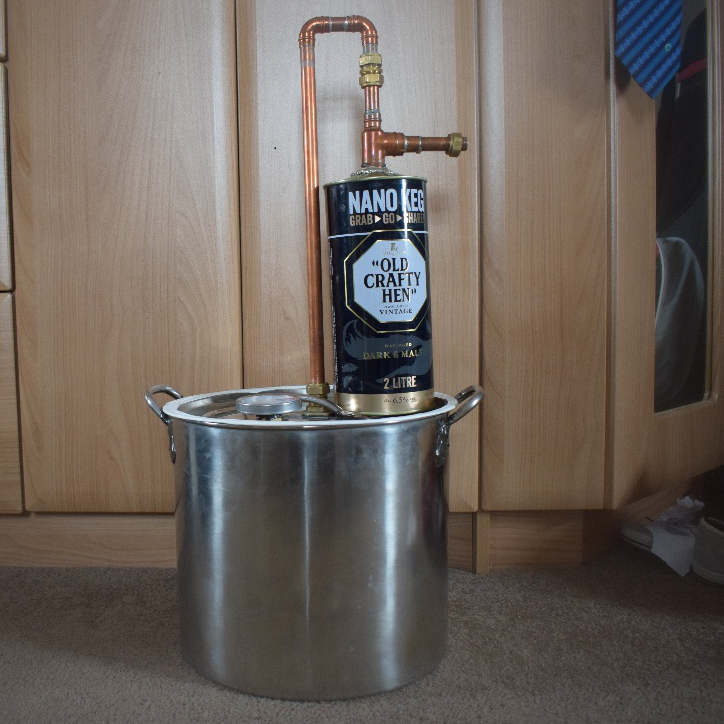
Step 4. Assembling the Still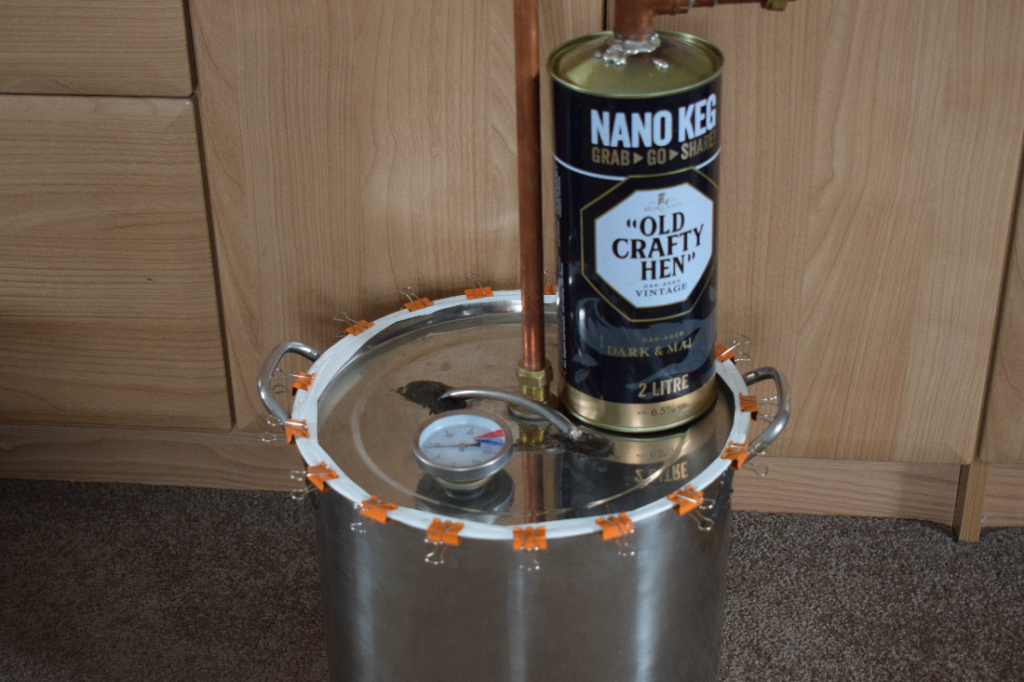
To assemble the still, first you will have to wrap the edge of the cooking pot lid with PTFE plumbers tape which can be found in most hardware stores or plumbing supplies. This is done to ensure that there are no leaks around the edge. Do not use plastic or rubber to seal the still as these materials can leach dangerous chemicals into the spirit. PTFE is safe for food use so is ideal for the job. Make sure to put on a sufficient layer. To hold the lid down use butterfly clips. Space them evenly all the way around the pot to ensure an even amount of pressure holding down the lid. Place the thumper on top of the lid and attach the column to the top of it via the brass connector and to the tank connector on the lid. Tighten these to ensure that there are no leaks in the system. With the thumper sitting on top of the boiler it allows the thumper to heat up quicker which speeds up the distillation process.
Step 5. Add the condenser
There are two main types of condensers that can be used;
1. Worm and bucket condenser
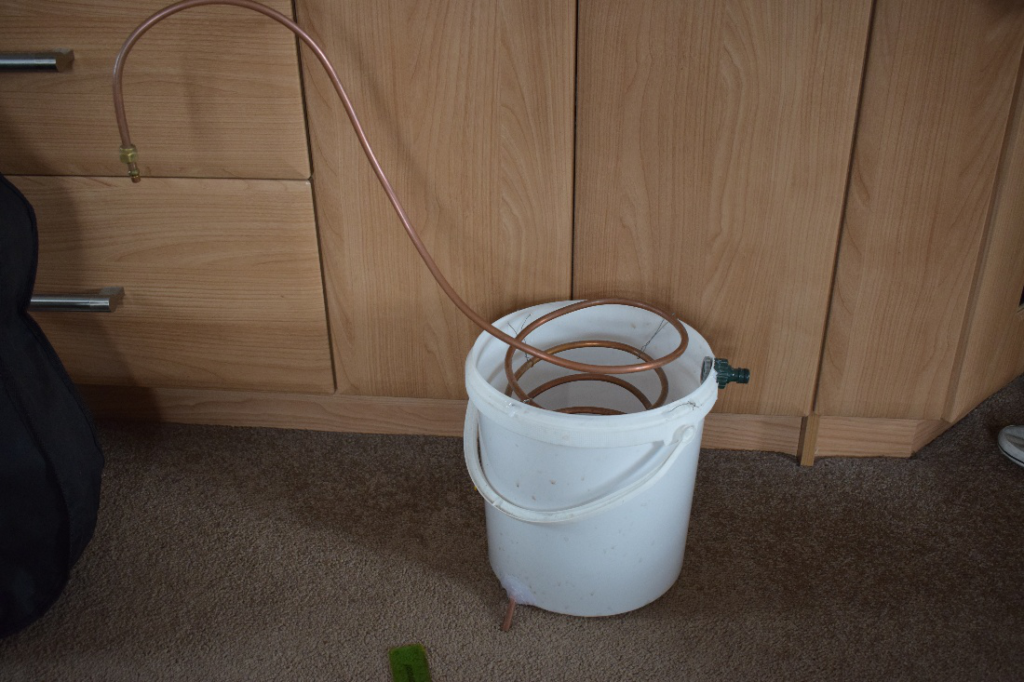
2. Liebig condenser
The worm and bucket condenser is the easiest of the two to put together, and the cheapest. The Liebig on the other hand, in my opinion much better to use as it is more effective and is much easier to use with less mess however, it is more expensive. I will hopefully write an article on how to make these at a later date.
I hope that this article has been informative and that it will allow you to put together your own still and get you onto the fun, addictive and sometime frustrating hobby of craft distilling. It is a never-ending learning curve and my advice to anyone just starting out is to read as much as you can from books and online. If you’re on forums and groups ask as many questions as possible. Remember there are no stupid questions, just stupid answers.
If you liked this plan you might also want to check out :
- Traditional Kentucky Whiskey Pot Still Plans – Learn How To Build A Pot Still At Home
- How To Make A Reflux Still – Complete Plans To Build A Homemade Still
- How To Build A Boka Reflux Still – Free Plan With Step by Step Instructions
If you have any questions drop us a line in the comments we’ll do our best to help. If you build this still plan please send us some photo’s of your build to learntomoonshine@gmail.com. We’ll post them below!
Also a big shout out to The Moonshine Man for putting this article together he designed and built this still. Check out his Instagram @themoonshineman can’t wait to see what he come’s up with next!