How To Make A Reflux Still – Complete Plans To Build A Homemade Still
In this tutorial I’m going to teach you how to make a homemade Reflux Still which is also known as a column still. This homemade still is comparable in quality to most professionally designed stills like this 8 Gallon stainless steel Reflux still but will cost you less to build.
What are the benefits of a Reflux still over a Pot Still ?
A Reflux still can produce high proof alcohol in a single run because it effectively re-distills the alcohol multiple times within the column before it is drawn off by the condenser. This is one of it’s biggest advantages over a pot still . If your looking to make a high proof flavorless moonshine then a Reflux / Column still is what you want to make.
Homemade Reflux Still Plans – Step by step guide
First up you’ll need to go out and buy the following materials to build the Reflux still:
Materials List:
- 1 – 1″ to ½ ” Reducing Coupling
- 1 – 1″ copper tube 23 ” long (Condenser Core)
- 2 – 1/2″ copper tube 7 ” long (Column Cooling Tubes)
- 4 – 1½” Copper Tube 2 1/2″ long
- 1 – 1½” Elbow
- 1 – 1½” to 1″ Reducing Coupler
- 1 – 1½” cooper pipe 17 1/2 ” long ( Condenser Jacket)
- 2 – 1½ X 1½ X ½ Tee Fittings
- 2 – 1½ End Caps
- 2″ Copper Tube 36″ long
- 2″ Copper Tube 3″ long ( Nipple )
- 1 – 2″ End Cap
- 1 – 2″ Tee Fitting 2″ x 2″ x 1½
Tools Needed:
- Hacksaw or Pipe Cutter
- Bench Vise
- Drill Press or Electric Drill
- Dremel tool or Round File
- Metal Drill Bit Set (or 5/8” & 1-1/8” metal hole saw)
- Propane Torch
- Tape Measure
- Lead-free solder & flux
- Sand cloth / steel wool (or copper joint cleaning brush)
Selecting A Boiler For The Reflux Still
Choosing a good boiler for your Reflux still is important. The most important thing is that the boiler you choose is made of stainless steel. Some examples include restaurant pots, beer kegs or used milk cans.
When choosing between these options you should think about how your going to attach the column to the boiler in some cases specialized welding and fabrication may be required to make the connection between the two units. Also the column should be easy to separate from the boiler for cleaning and storage and it should be large enough to distill batches of mash. Make sure you have considered all these things before you commit to choosing a specific boiler.
I’ve choose to use this stainless steel milk can which I bought from Amazon for this project. It’s durable, easy to clean and comes with a 2 inch tri-clover connection in the top of the lid for your tower. Makes things easy no fabrication required. I’ve also used kegs before they work great as boilers but do require custom fabricate for clean out and column connections. The best thing about using a Keg is it’s a great excuse to buy/drink one.
Building The Top End Of The Still
The top end consist of several components including the reflux column, the cooling tubes, and the condenser. We will build each one separately and then put all three components together. Let’s get started.
Building The Condenser Section Of The Still
We’re going to build a jacketed core condenser for this still. I love this style of condenser because it is simple, efficient and durable. Below is a diagram of the condenser assembly to give you an idea of what your going to build.
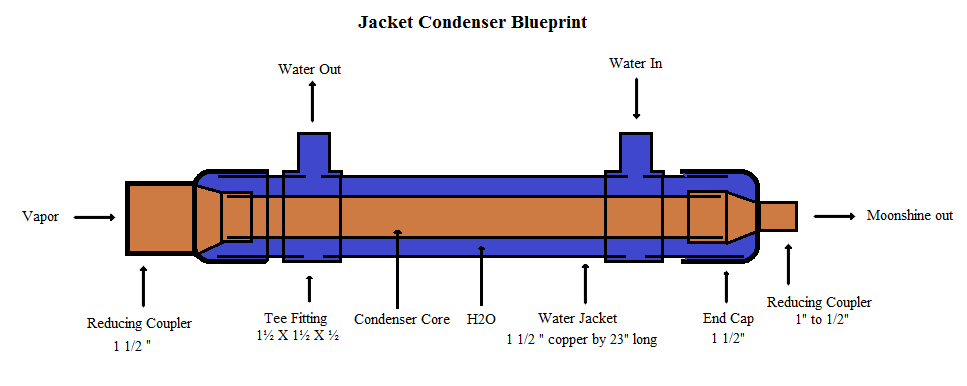
With this condenser water circulates through the water jacket cooling the condenser core. This process strips the heat from the vapor entering the condenser unit and turns the alcohol vapor into liquid form. We won’t get into the process of designing the condenser for efficiency as that’s beyond the scope of this project and I’ve already done the hard work for you.
To increase the amount of Reflux within the column of the still I’ve run the 1/2 ” supply and return lines to the condenser through the column. For the still to operate correctly the direction of water flow is important. The water should enter the bottom of the condenser and exit out the top. See illustration above for details.
How To Assemble Condenser Core For The Still
The Condenser Core is responsible for transferring heat between the distillate vapors within the Reflex still to the water surrounding the Core while keeping the two fluids separate. To build the condenser core follow these steps:
- Step 1 – Cut a 23 ” long section of 1″ copper pipe
- Step 2 – Using the Lead Free Solder, Solder a 1½ ” X 1” reducing coupling to the 23″ length of 1″ pipe
- Step 2 – Solder the other 1” X ½ ” reducing coupling onto the other end
How To Assemble Condenser Jacket For the Still
The condenser jacket is the part of the reflux still which is responsible for condensing the distillate alcohol. To build the Condenser Jacket follow the below instructions:
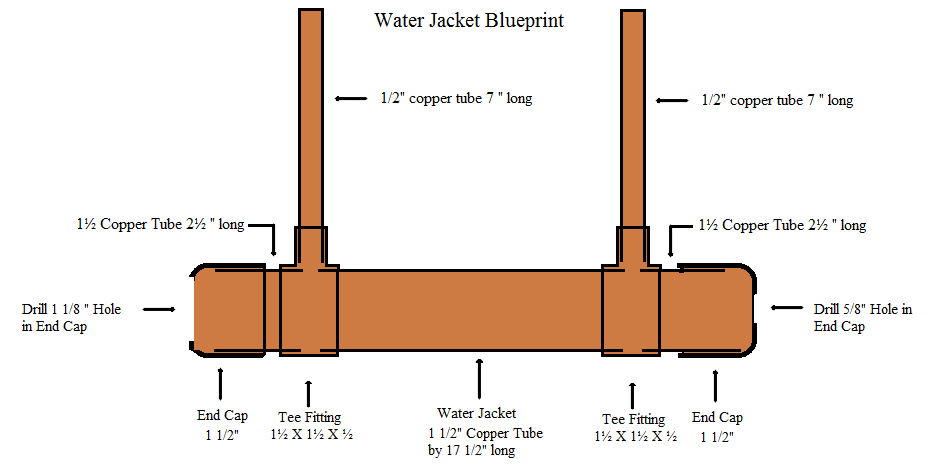
- Step 1 – Drill a 1 1/8” hole in one of the two 1 ½” End Cap

- Step 2 – Drill a 5/8″ hole in the other 1 ½” End Cap
- Step 3 – Cut a 17 ½ ” length of 1 ½” copper pipe
- Step 4 – Cut 2 – 2 ½ ” lengths of 1 ½” copper pipe
- Step 5 – Assemble the condenser jacket as shown below, place condenser core inside jacket to make sure it fit’s properly. You may have to fine tune it so everything fits properly. Once your satisfied with how everything looks Solder all joints.
- Step 6 – Place 1/2″ copper tube 7 ” long into tee fittings on condenser and solder in place
When the Condenser is fully assembled it should look like the image to the right.
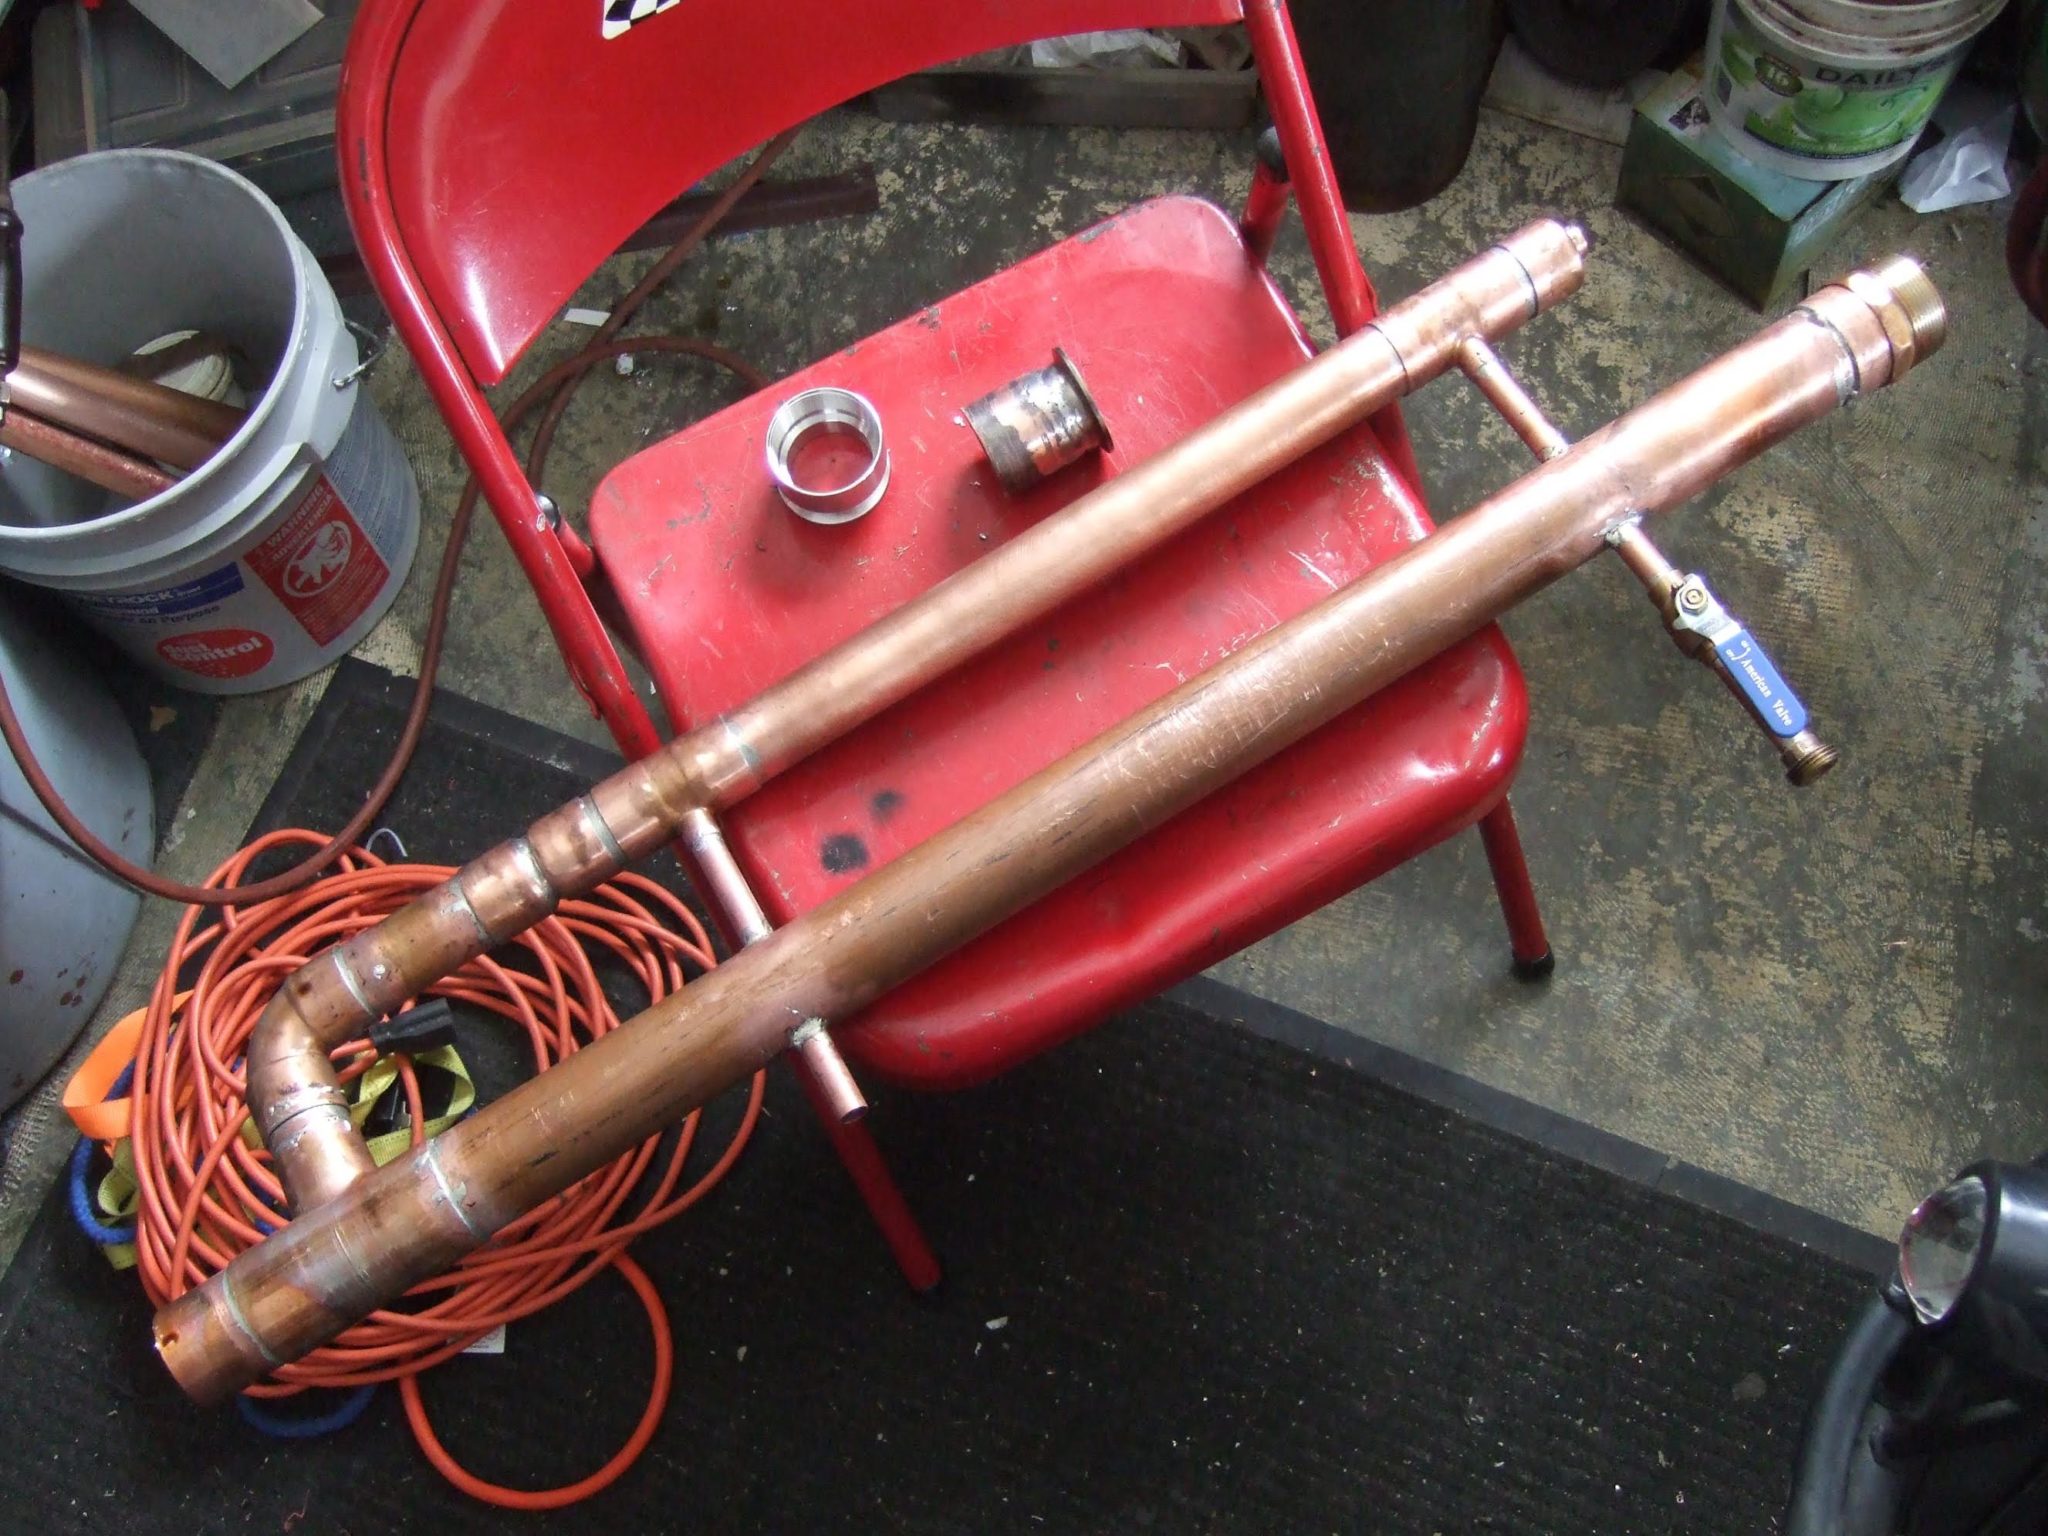
Building The Reflux Column of the Still
The reflux column is the part of the Still that is responsible for producing high proof alcohol. It does this by producing multiple distillations within the column. To build the Reflux column we need to assemble a few things first.
How To Assemble the Column Head
The column Head is the top section of the reflux column and consist of a 2 x 2 x
1 ½” tee, a 3″ long piece of 2″ copper pipe, a thermometer and a 2″ cap. See illustration below for further details.
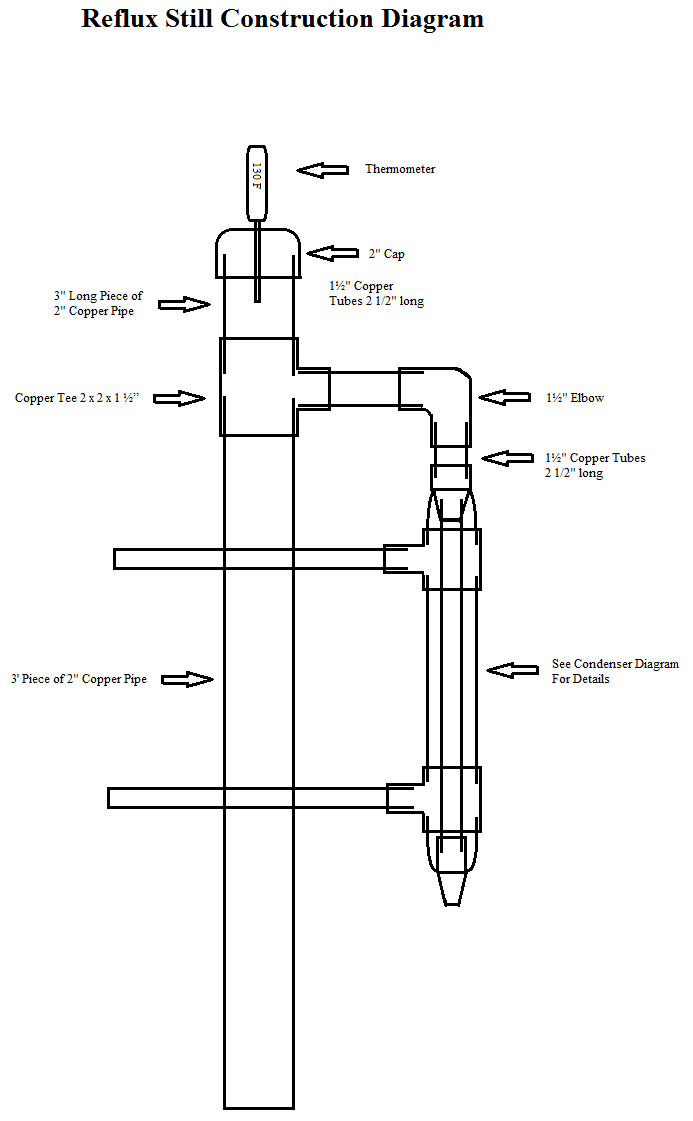
To build the column head do the following:
- Step 1 – Drill a 3/8 ” hole in the top of the 2″ end cap. Fit the rubber grommet and thermometer into the hole to make sure they fit.
- Step 2 – Place 3″ long piece of 2″ copper pipe into top of 2 x 2 x
1 ½” tee and solder in place. - Place Cap on top of 3″ copper pipe. ( Do Not Solder This Piece – Cap will remain un soldered so that your able to open the top of the column for cleaning after use.
How To Assemble the Column Body
The column body is made up of a three foot piece of 2″ copper pipe. The bottom of the column body attaches to the boiler and the top attaches to the column head that you just made.
To build the column body follow these steps :
- Step 1 – Cut a 3′ piece of 2″ copper pipe
- Step 2 – Measure from the bottom of the pipe up 1.5 ‘ place a mark. This will Mark the Center point of the pipe.
- Step 3 – Measure from the center point up 9 1/4 ” and down 9 1/4 ” place a mark at both locations. These two marks should match the lower and upper cooling tubes coming from the condenser.
- Step 4 – Using the marks from Step 3 drill two 5/8″ diameter holes directly through both sides of the copper pipe.
- Step 5 – Slide the condenser through the two 5/8″ holes
- Step 6 – Place the column head onto the top of the body
- Step 7 Attache the 1½” Elbow and the 1½” Copper Tubes which are 2 1/2″ long from the Tee Joint on the top of the column to the top of the condenser. Once you are sure everything fits together correctly solder all joints.
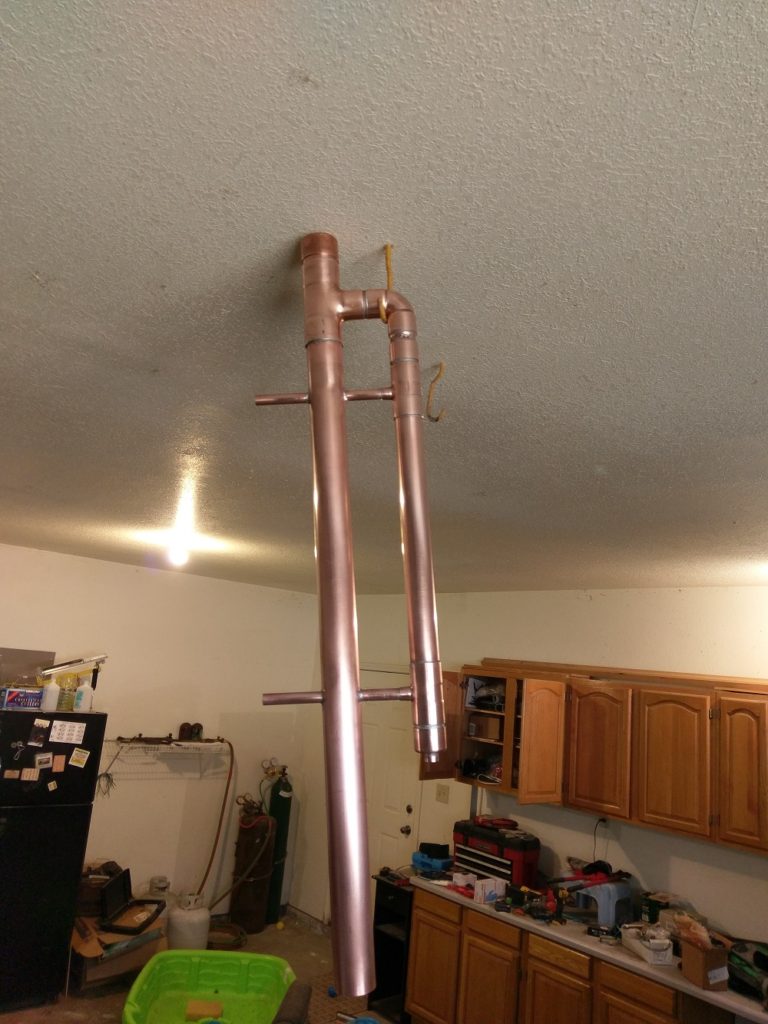
I found an awesome video that does a good job at showing how the column is put together. Wanted to give Aquaticredneck a shout out for making this video and allowing me to share it with you guys. This is what your Reflux column should now look like:
How To Attach The Reflux Column of the Still To The Boiler
The final step to building the still is attaching the column to the boiler. You may have to alter these instructions depending on the boiler you decided to use. Later I will try to post a how to guide for attaching a still to a keg and a cooking pot but for now we will stick to the milk can which is what I’m using.
If your using a Keg or cooking pot you’ll need to make a mounting flange on the bottom of the column. In this case this is not needed because on the Stanless Steel milk can it has a removable lid. Follow these steps to attach the reflux column to the boiler:
- Step 1 – Drill a 2 1/8” hole in the lid of the milk can
- Step 2 – Slide 3″ of the copper column through the hole and Mig weld in place ( If you don’t have a Mig welder take it down to your local welding shop they will be able to do it for you for a reasonable price.
- Attach heavy duty screen to 3″ of copper pipe sticking out of the bottom of the lid and fasten with a 2″ stainless steel hose clamp. (This will hold the column packing in place)
How To Choose A Column Packing For Your Reflux Still
Now that your done building the Reflux / Column Still you need to pack it. The Packing increases the surface area available for alcohol vapors to condense on and will greatly increase the amount of Reflux within the still thus giving you a higher quality final product.
Commonly used packing  material for Reflux stills include stainless steel scrubbing pads, marbles, broken safety glass from an automobile, glass beads or raschig rings. The idea here is to use a packing material with a high surface area that won’t release impurities or poisons into the Moonshine. It also shouldn’t be affected by the high heat and moisture conditions within the still.
I personally love using Raschig rings because they are easy to remove from the column of the still and they will not corrode. However they can be hard to find locally. You can buy them online here. My second choice for packing is stainless steel pads which work great and can be purchased at any hardware store however they can be a pain to remove from the column and can corrode over time.
How To Pack The Column Of A Reflux Still
Whatever packing material you choose for your column the procedure for packing it is the same. Follow these steps to pack your column:
- Step 1 – Make sure screen on bottom of tower is firmly attached to hold packing in.
- Step 2 – Add Packing to tower until column is filed to just above the top of the highest cooling tube in the column.
- Step 3 – place cap back on top of column.
Heat Source For Your Homemade Reflux Still
There are several different options when considering a heat source for your homemade reflux still. These include using a stove top, an external propane boiler or a internal electrical immersion heater. Let’s look at all three options so you can decide which to use.
Stove Top Heat Source – If you don’t mind making moonshine in your home this is the easiest option. Although be warned if your making multiple batches don’t expect to use your stove for cooking for several days!
Propane Boiler – I like the idea of using a propane boiler unit because it’s portable which means it can be used outside or in your workshop. It’s also easy to clean, no fabrication needed and very easy to fine tune the heat going to the still.
Electrical Immersion Heaters – This is the most efficient option in terms of power consumption. However it is more difficult to clean and you can only use this type of heater for Sugar Washes. If you were to use an electrical immersion heater in a corn or grain mash you would burn the mash and have a terrible flavor in your moonshine.
For this still I’ve chosen to go with the propane boiler. I’ve posted a photo below so you can see what it looks like.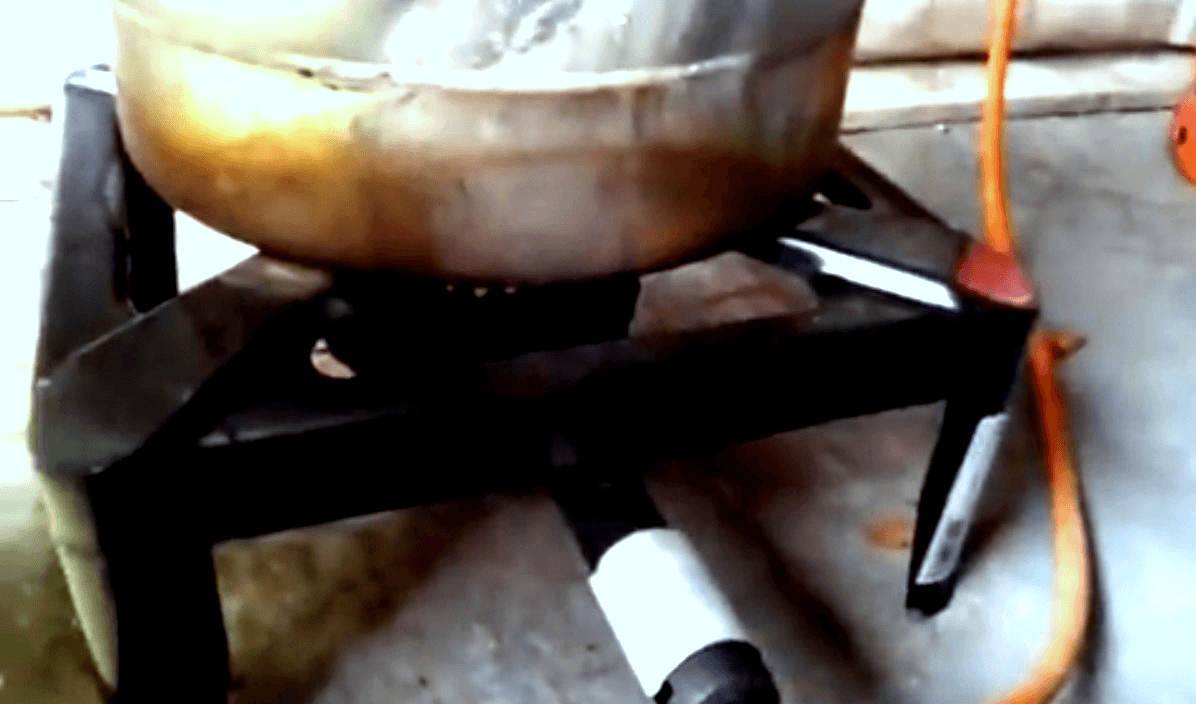
Hooking Up Water To Your Newly Built Reflux Still
Before you start distilling you will need to hook your still up to a water source. I like to use a garden hose. Simply clamp the hose on the inlet of the condenser ( i.e the lower 1/2″ copper tube located on the condenser and hook another hose running to a drain on the upper tube coming from the condenser. You can adjust the flow of water to your still by the garden hose shut off valve.
How To Distill Alchol with Homemade Reflux Still
If you’ve never made your own alcohol before or you’re hungry to learn more about making moonshine. I’ve put together this list of 5 how to moonshine books I think every one should read. If you read even one of these books you’ll be well on your way to understanding the theory and concepts that will allow you to safety operate the reflux still and make a great tasting spirit at the same time. Now keep in mind most of the information you’re probably seeking is available for free online if your willing to spend the time looking for it. If you would like more information on distilling for “FREE” then check out our Distilling 101 section for tips and tricks to making the best Homemade Moonshine!
This concludes my tutorial on how to build a reflux still. I’d love to hear some feed back from you. If you have any questions leave a comment below. If you’ve built your own reflux still post some pictures of your still you’ve made.
Other Still Plans You May Like :
- Boka Reflux Still Plan – Complete Step by Step Guide
- Simple Pot Still Plan – Great experiment to get you started
- Copper Coil Condenser – How To Make One At Home
Completed Home Made Stills
If you’ve decided to take on the challenge of building you’re own copper still why not show it off! Send us a photo ( learntomoonshine (at) gmail (dot) com ) of you’re complete still and we’ll add it below. If you’ve made alterations from the plan outlined above please tell us what you changed.
Jeff sent in a pic of his completed column and says ” I attempted to tig the stainless to the copper, I guess you can say that technically I did do it but as you can see it didn’t pass my quality control! On reflection I think I should have learned to ti steel first, you know… crawl before you walk or in this case run a marathon. A friend told me where to get the threaded fitting, (Mile high in Denver) wish I’d researched that!”
Jerry sent in a pic of his still built from the above plans and says ” Thanks for build instructions! I was able to build my column without much issue, aside from having to finesse the condenser unit to fit together to my liking. ”