How To Solder, Braze And Weld Stainless Steel To Copper – In 5 Easy Steps!
If you’re building a project that requires you to join a copper and stainless steel part this article will teach you how to do it. In my case I was building a homemade pot still and needed to bond the Stainless Steel tri clamp ferrules to a 2″ copper column. This is a very common joint in the brewing and distilling industry, and knowing the proper way to join these two dissimilar metals will ensure the success of a project. It is possible to purchase a 2″ copper ferrule that can be soldered in place but they are fairly expensive compared to the stainless steel ones and we’ve had discussions in the Facebook Group about the copper ferrules not sealing properly over time. Due to the softness of copper and these ferrules can be prone to scratching and denting. For these reasons I think I’ll stick to using a stainless steel tri-clamp ferrule. So the big question here is can copper be joined by brazing, soldering or even welding them together and if they can, how do you do it ?
Can Copper and Stainless Steel Be Welded Together?
So can copper and stainless steel be welded together? The short answer is “Yes” they can be welded together but it’s extremely difficult and offers very little structural strength. Why you ask ? Well here’s the long answer.
There are two issues with welding copper and stainless steel. First up the two metals have substantially different melting points. Stainless steel melts at around 1400 °C while copper melts at 1085 °C that’s a difference of 315 °C this makes forming a puddle of the two metals extremely difficult. Then there’s the metallurgical issues of dissimilar metals mixing together during the welding process. Because stainless steel is not fully soluble with copper and has a substantially higher melting point, it will begin to solidify and form grain/crystal structures first. The copper present will remain a liquid and will be forced between these forming crystal structures, creating a very week bond. As the weld cools further, the stainless steel grain will begin to contract due to cooling, thus causing the grains to pull apart. At this point the copper is still to hot to add any structural strength to the grain structure and the weld will form large cracks, this is known as hot-cracking. Hot cracking severely compromises the weld strength of this type of weld. If you want to join copper and stainless steel brazing or soldering is your best bet. That said if you have the right equipment and the skill like Eb industries welding copper and Stainless together can be done.
How To Tig Weld Copper To Stainless Steel
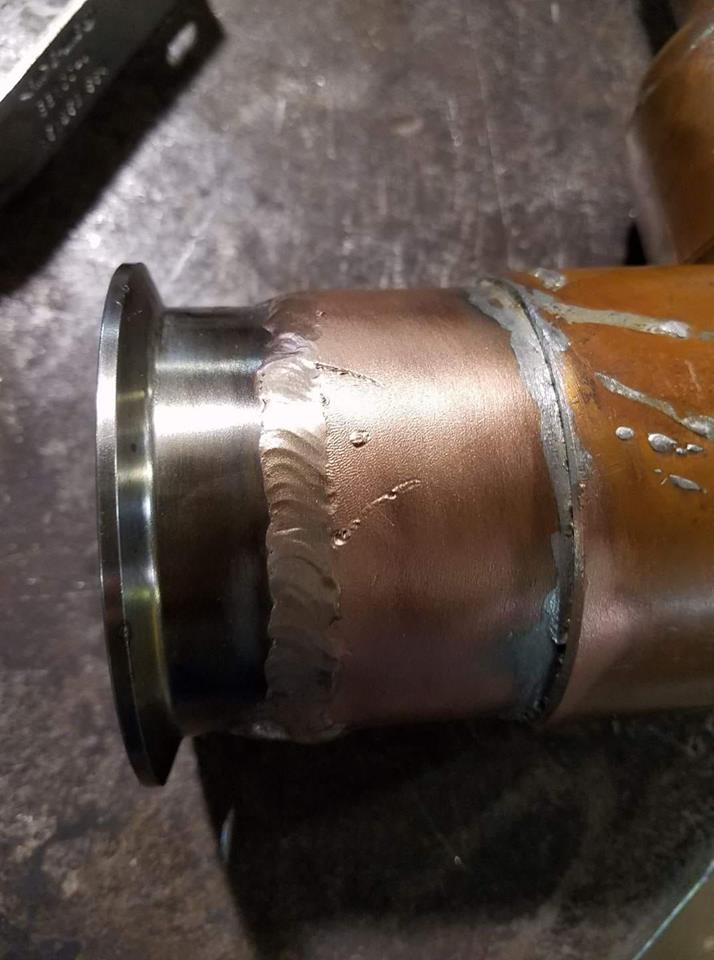
If you don’t have an Electron beam welder in your garage like Eb Industries there’s another way to weld/braze stainless and copper. Below is a picture of a successful copper pipe to stainless steel tri clamp ferrule weld. This was done using a Tig welder with silicon bronze rod. Now technically this would be classified as Tig brazing, because the stainless steel has a higher melting point then the silicon bronze filler rod. Silicon bronze rod has a melting temp of around 1050°C, while stainless steel has a melting point of 1400-1450 °C. The process is discussed more on adiforums.com if your interested in seeing what some pro’s say about Tig welding copper and SS.
If you want to try welding/brazing copper to stainless steel with your Tig welder Tom Spisak III has some good advice. He says ” Anyone with some Tig experience should be able to make this bond use Silicone bronze wire it’s readily available at your local welding supply shop. ” The picture above show’s a weld Tom made between a stainless steel tri-clamp ferrule and a copper pipe.
What You’ll Need To Weld/Braze Copper and Stainless :
- Tig Welder
- Argon Gas
- 1/16″ Silicone Bronze rod
- Pointed Tungsten electrode head
Tig Welding Procedure:
- Step 1: Clean all parts to be welded/brazed with a piece of Emory or steel wool.
- Step 2: Assemble parts making sure they fit snugly together. Clamp if required.
- Step 3: Turn on Argon gas, set Tig welder to DC and
33 pps with a pointed tungsten electrode. - Step 4 : Concentrate your heat on the copper slowly add filler rod material to the pool while dragging your pool to the stainless steel
ferrule. You don’t want to melt the Stainless steel here otherwise you will get structural cracking as mentioned above. - Step 5 : Once you’ve completed the weld check for imperfections by cleaning the area with a wire brush, also check for any leaks. If your building a still like I am you’ll want to make sure there’s no leaks.
Here’s a video that demonstrates Tig welding/brazing copper to Stainless steel.
Can Copper and Stainless Steel Be Brazed or Soldered Together ?
Yes copper and stainless steel can easily be soldered or brazed together using a filler material that usually contains tin and silver . Unlike welding were we melt the two metals together, brazing or soldering use a filler material to bond the two parts together without melting them. Temperature distinguishes brazing from soldering, were brazing typically requires heating over 450°C/840°F to bond parts using brazing rod. Soldering is done at temperatures below 450°C/840°F using solder. Both filler materials contain silver, the higher the content of silver the higher the melting point and the stronger the bond between parts. So brazing will yield a much stronger bond then soldering.
How To Solder Stainless Steel To Copper
If you choose to solder your components together a common plumbing solder containing 95% Tin 5% Antimony will do the job just fine. You can also use Lincon Electric Solder Stay-Bright Kit With Flux that is 95% Tin and 5% Silver for better results. Both solders will have a melting point of 230°C /450°F and can be heated with a simple propane or Mapp gas torch. You will need to thoroughly clean both pieces and apply a coating of flux to all surfaces to be soldered. I like Harris white flux paste for this job. Flux is important because it dissolves oxides that form during the heating process and it aids in the flow of solder into the joint by providing a shield against oxygen in the air. Below is a video of soldering stainless steel to copper and then testing the joint for strength.
I’ve broken down the process of soldering copper to stainless steel fittings in a step by step format below that should make it super easy to follow. If you are going to be soldering copper to copper you might be interested in this How To Guide To Soldering Copper
Materials Needed For Soldering:
- Propane or Mapp gas torch
- Plumbing solder containing 95% Tin 5% Antimony or Lincon Electric Solder Stay-Bright Kit With Flux that is 95% Tin and 5% Silver is better
- Harris white flux paste or equivalent flux make sure it is capable of etching stainless steel.
- Steel wool or emory cloth
Soldering Procedure:
- Step 1 : Clean all parts to be soldered with a piece of Emory or steel wool.
- Step 2: Apply white flux paste to the surfaces to be soldered. It’s important to use a flux suitable for stainless steel as it needs to etch the surface so that the solder can bond properly. You could use
Muriatic (hydrochloric) acid, phosphoric acid, fluoro-borate fluxes and zinc chloride will all work. - Step 3: Place the two parts together and begin apply heat with either a propane or MAPP Gas torch to the copper. Don’t directly heat the stainless steel. Once the solder begins to melt onto the copper move the heat onto the stainless steel. Heat until you see the solder flow into the joint. Then remove heat source.
- Step 4: Let part cool until warm then wipe off excessive flux with soap and water.
- Step 5: Perform a leak test to verify joint is fully sealed.
Here’s a few more products recommended by the Home Disttilers of America Facebook group members:
How to Braze Stainless Steel To Copper
Brazing copper will provide a stronger bond because of the high % of silver in the brazing rod. But will also cost more and requires the use of an acetylene or Mapp gas torch to melt the brazing rod. You can purchase brazing rods with varying % of silver content and either flux coated or un-coated rod. In my case I would recommended using a Blue flux coated 45% Silver brazing rod which has a melting temperature of approximately 600°C/ 1100°F to join the copper and stainless steel parts. If you required greater strength you can use orange flux coated 56% silver brazing rod. You’ll also want to apply Harris “Stay-Silv” silver solder flux or an equivalent product to clean all parts before brazing. Below is a video demonstrating how to braze copper to stainless steel.
I’ve broken down the process of brazing copper to stainless steel fittings in a step by step format below. Before you start it’s important for you to understand you can damage the surface of stainless steel by overheating it during the brazing process. Chromium is used in stainless steel to prevent corrosion, when you heat stainless between
425–870 °C ( 800–1600 °F ) for prolong periods of time the chromium can diffuse away from the surface and form chromium carbides, which will make the steel no longer stainless. Leaving it prone to corrosion and cracking. You can prevent this by avoiding excessively heating parts and quenching your parts in water after 4 min of heating.
Materials Needed For Brazing:
- Acetylene Torches or Mapp Gas Torch
- Blue flux coated 45% Silver brazing rod
- Steel wool or emory cloth
Brazing Procedure:
- Step 1: Clean the surface with steel wool or an Emory cloth.
- Step 2: Apply Flux to both surfaces to be brazed, make sure you have a flux that is capable of etching stainless steel and that is meant for the high heat of brazing (over 840 F) you can’t use typical plumbing flux here.
- Step 3: Slip parts together and start heating the Copper in a circular motion making sure to heat it evenly around the pipe. When the brazing rod starts to flow move the torch more to the stainless this should draw the filler into the joint between the two parts. Stainless steel transfers heat slower then copper so it won’t tank nearly as long to heat up to temperature. Which is why we start heating the copper first. If you are brazing a valve which can be temperature sensitive wrap the valve with a wet rad to keep the interior parts of the valve from melting.
- Step 4: Let part cool until it’s warm to the touch and then remove flux with soap and water before fully cooling down.
- Step 5: Perform a leak test to verify joint is fully sealed.
What’s the difference Between Flux Coated vs Un-coated Silver Brazing Rod?
Let’s talk advantages vs disadvantages of using flux coated brazing rods vs un-coated brazing rods. The obvious advantage to using flux coated brazing rods is convenience. We don’t need to apply flux to the parts we are brazing because it’s already on the rod and thus we don’t need to purchase silver solder flux separately. The disadvantage with a flux coated brazing rod is that it’s difficult to control the amount of flux applied to our joint when it’s already on the rod and worse if you overheat the joint the flux can form a hard black glass like film that is incredibly hard to remove. I’ve heard arguments either way I personally like the flux coated rods better. I’d love to hear your opinion here on which method you prefer, drop me a comment at the bottom of the article.
Other Resources
Here’s some further resources about soldering, brazing copper and building stills that are worth a read.
- Homedistillers.org – How-to Solder SS Ferrule to Copper Pipe
- Facbook Group Discussion – Tips on Attaching Stainless Furrel To Copper Pipe.
- Ebindustries.com – Welding Copper To Stainless Steel
- Learntomoonshine.com – Build Your Own Copper Moonshine Still
If you’ve got any questions, or think I missed some information that should be included in this article feel free to leave a comment at the bottom. I love when you guys help out to improve these articles. Don’t forget to join our Facebook Group it’s a great place learn and share knowledge about distilling.